I'm working lately on plug-ins development for my WordPress blog (mynixworld.info). There are thousands plug-ins available out there but some are either limited, not well written, obsolete or buggy. I have written several plug-ins that I want to make available freely for community. Although they seem to work fine on my Linux setup I have no clue about their behavior on a Windows setup. So here I am, installing WordPress on IIS 6 on a Windows Server 2003 R2 (SP2 - x86). This article describes step by step all I have done to make WordPress working on IIS 6. Step 1: Go to http://windows.php.net/download and download PHP 5.3 (VC9 x86 Non Thread Safe) Step 2: Extract the ZIP to a local disk (eg. D:\PHP) Step 3: Clone the file D:\php\php.ini-development (or php.ini-production) as D:\PHP\php.ini Step 4: Edit the PHP configuration file (D:\PHP\php.ini) as following:
toggle some options:
log_errors : On
memory_limit = 256M (or whatever fits you)
cgi.force_redirect = 0
cgi.fix_pathinfo=1
cgi.force_redirect = 0
fastcgi.impersonate = 1
fastcgi.logging = 0
enable some extensions (it depends on your WP dependency):
extension=php_bz2.dll (I need it for my WP Ez Backup plugin)
extension=php_curl.dll (I need it for my Wikipedify and WP Ez Backup plugins)
extension=php_fileinfo.dll (I need it for my WP Ez Backup plugin)
extension=php_mysql.dll (it is required by WP core)
adjust the date-time settings:
date.timezone="Europe/Stockholm"; #see http://php.net/date.timezone for more info
Step 5: download and install FastCGI for IIS extension (it installs with next->next->finish; normally it detects and installs in the PHP install dir, i.e. D:\PHP) Step 6: add the newly installed FastCGI extension (i.e. D:\PHP\php-cgi.exe) into your IIS:
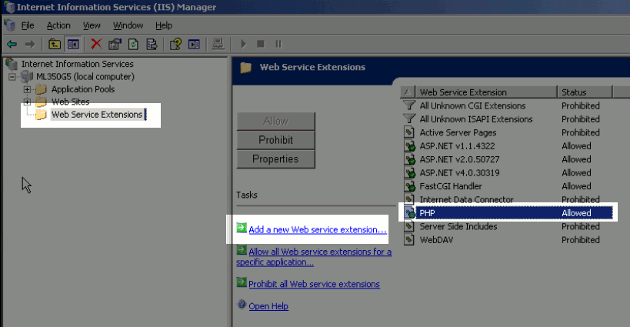
Start->Administrative Tools-> IIS Manager
select your desired IIS Server (probably localhost) then expand its folders
click on Web Service Extensions:
Click the Add a new Web service extension:
Extension name=PHP
Required files=D:\PHP\php-cgi.exe
Set extension status to Allowed
right-click on Web Sites and add a New Website:
Description=WordPress
IP Address and Settings (default or as it suits you)
Path=D:\www\wordpress (the www folder of your WordPress website)
Access and Permission=Read,Execute
right-click on your newly created website (WordPress) and choose Properties:
select Home Directory tab then press Configuration button:
In Mappings tab press Add button:
Executable=D:\PHP\php-cgi.exe
Extension=.php
select Documents tab then press Add button:
Default content page=index.php
Move the index.php on the top (by Move up button)
(optionally) if you have running multiple websites at the same IP/port you can either use another port or you can use a different CNAME for your website:
select Web Site tab:
configure the blog to run at a different port:
enter port 81 (or whatever) in the TCP port field (you'll access the website as http://localhost:81)
configure the blog to run on the same port (default 80) but with different CNAME:
think/define your blog CNAME (eg. wp.localhost)
press the Advanced button the the Add button to define a new website identification:
enter TCP port=80 and Host Header value=<your CNAME> (eg. wp.localhost)
open the file c:\windows\system32\drivers\etc\hosts and define your CNAME by adding the following line at the end of it:
127.0.0.1 wp.localhost
(optionally) right-click your desired IIS Server (probably localhost) then All task->Restart IIS
Step 7: Go to http://www.mysql.com/downloads/mysql and download the MySQL Community Edition for Microsoft Windows (preferably MySQL Installer MSI that allows you to choose the mysql-installer-web-community-x.x.xx.x.msi which is only 1.5MB) Step 8: Run the MySQL installer:
Choose Install MySQL Products then click Next
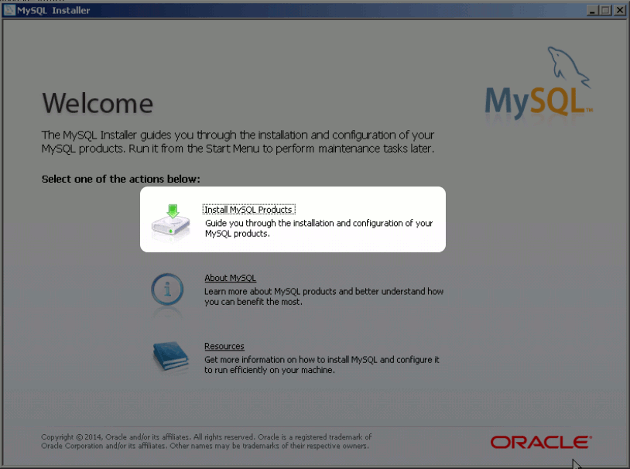
Agree the license and terms then click Next
Choose one of those Setup Types that includes the Server component (i.e. Developer Default, Server Only, Full or Custom with Server component); make sure you include also Client application, Workbench is especially required if you want to access the MySQL instance via a GUI interface (we are gonna need it later, see Step 9)
Click Next-Next-> ... -> until Configuration screen requires you to define a user:
define an Admin user (i.e. 'root' user of your MySQL instance) that matches your needs
Click Next -> ... -> Finish
Step 9: Create a MySQL database and user for the WP website:
open a MySQL connection or a MySQL GUI that allows you to send SQL commands to MySQL instance then enter the SQL commands below:
CREATE DATABASE wordpress;
CREATE USER 'myuser'@'localhost' IDENTIFIED BY 'mypass';
GRANT ALL PRIVILEGES ON wordpress.* TO 'myuser'@'localhost';Step 10: Go to https://wordpress.org/download and Download the current version of WP:
extract the downloaded ZIP content in your prefered WP 'www' folder (eg. D:\www\wordpress)
rename the file D:\www\wordpress\wp-config-sample.php as wp-config.php then change the following constants :
define('DB_NAME', 'wordpress'); # see the Step 8 above
define('DB_USER', 'myuser'); # see the Step 8 above
define('DB_PASSWORD', 'mypass'); # see the Step 8 above
If you have followed this guide step by step and if there is nothing especial with your local Windows setup then you should be able to access the WordPress blog right now (i.e. http://localhost). If you have a backup of an existent WP blog (i.e. the backup for files and the backup for MySQL db) and you want to use it instead of starting from scratch (i.e. you want to migrate your blog entirely) then you can do the following:
SKIP step 10 entirely (you DON'T want to mix apples with oranges, do you?)
extract your WP file backup at the existent path (eg. D:\www\wordpress)
connect the MySQL Workbench utility and establish a connection to your WP database (see Step 8 for login credentials)
load the .sql script and execute it; hopefully it was generated OK and will run without problems
Comments
No comments yet
Be the first to leave a comment.
Leave a comment